Featured

Update on Green Living

I am proud to say that I have avoided bringing at least 150 plastic bags into my home in the last 2 months! And I feel good about it. If you look at my previous post https://wordpress.com/block-editor/post/happytimebreak.wordpress.com/1170 I talked about the steps I’d been taking to try to live a greener lifestyle despite the pandemic. I just want to share some updates on this topic.

So first of all I was very pleased with the set of 4 cotton bags (Red Earth brand) I’d ordered from Amazon. These are sturdy bags with at least six side pockets on the inside which is very handy while loading bottles or jars. They did shrink a little after machine wash (I do wash them in quick wash setting after every grocery trip in cold water and then air dry them).

But soon I realized they were not enough so I ordered a set of 5 cotton canvas bags as well as a set of 10 cotton mesh bags. The latter came in large, medium and small sizes and I use them for buying produce. I wash the canvas bags in machine but hand wash the mesh ones. And yes ALL of them did shrink as they are made of 100% cotton but they are still roomy enough for the average grocery shopping trip.

Loading grocery in the cotton bags followed by unloading, washing, drying, and folding them may seem like a tedious process but in the end it’s all worth it especially when I look back on the number of plastic bags that I avoided bringing into my home and sending them to the recycling center!

Yes often we kid ourselves into thinking that we’ve done a great job at recycling but not every piece of plastic gets recycled and if they do, some of them are turned into products that may not be able to be recycled further! So it just makes sense to “avoid” getting plastic and non recyclable things into our homes in the first place!

Hope this post inspires anyone out there who is trying to get started on living sustainably. More in a future post!

Wholesome Earthy Salad

Here’s another easy, healthy, wholesome recipe using Quinoa pronounced ‘keen-waa’. You must have seen its different varieties – red, white or tricolor. I personally prefer the white as I feel it cooks a little faster. But let me get straight to the point. It is gluten free and rich in protein and fiber so it is great for weight control. Also it has low glycemic index so it also helps control the blood sugar. But it is so delicious with that nutty flavor. To raise the overall nutritional effect, I have included lots of veggies and some nuts. You are going to love this recipe!

Ingredients

Quinoa 1 cup

Water 2 cups

Olive oil 4 tsp

Cumin seeds 1/2 tsp

Red cabbage 1 cup shredded

Green cabbage 1 cup shredded

Bell Pepper 1/2 cup chopped – any color

Broccoli 1 cup small pieces

Celery 1/2 cup chopped

Chickpeas 1/2 cup cooked (optional)

Mixed nuts 1/4 cup

Raisins 1 tbsp (optional)

Salt to taste

Method

1. Rinse the quinoa in water at least 2-3 times and let it sit.

2. Heat 1 tsp olive oil in a saucepan. Add the cumin seeds, let them sputter then add the drained quinoa and stir continuously for about a minute. Don’t let the quinoa stick to the bottom of the pan.

3. Add the water to the pan and add some salt at this point. Stir once more and let the water come to a boil on medium high heat. Allow to cook for about 10 minutes or until quinoa has absorbed most of the water. Then reduce the heat and cook the quinoa covered on low heat for 10-15 minutes. Remove from heat and let it sit for 10 minutes. Uncover the pan and fluff up the cooked quinoa.

4. Heat the remaining oil in a pan on medium heat and add the cabbage – red first followed by the green. It’s because the red cabbage is a little hardier. Cook until cabbage is a little soft and then add all the other veggies, chickpeas, mixed nuts and raisins. Don’t forget the salt!

5. Time to combine everything – cooked quinoa and the veggie mixture. Your Quinoa Salad is ready. Voila!

Notes

Keep some extra cooked quinoa in the refrigerator for future use say to be used in 3-4 days. I often freeze extra cooked chickpeas to be used in salads or other recipes. You can use canned chickpeas or substitute them with black beans. They are a great source of protein and fiber. So you can use as much as you want. I also happen to blanch and freeze broccoli so that they are always available for salads or pasta. That’s all. Hope you give this recipe a try!

Easy quesadillas

Quesadilla pronounced kei-suh-dee-uh, is a popular and savory recipe from Mexico, easy to prepare at home. It is basically a flour tortilla packed with veggies and cheese, served with salsa and or guacamole. So it can prove to be pretty healthy if you load up on the veggies and cut out the cheese! And these days it is pretty popular at my home. So I thought why not share it with all of you!

Ingredients

  • Flour tortillas – 2 large
  • Canned black beans – 1
  • Romaine lettuce – 1/2 cup shredded
  • Spinach – 1/2 cup shredded
  • Bell peppers – 1 cup thinly sliced
  • Onion – 1/2 cup thinly sliced
  • Jalapenos – thinly sliced (according to taste)
  • Salt – 1/8 tsp (adjust according to taste)
  • Cheese – as much as you like
  • Cooking oil – 1 1/2 tsp
  • Guacamole – home made or store bought

Method

  • Heat 1 tsp oil on medium and saute the onions followed by bell peppers and jalapenos. Add the salt.
  • Empty the beans into a heat proof bowl and cook in the microwave for 3 min.
  • Next warm a tortilla on a pan and keep it aside, cooler side up.
  • If you do have guacamole with you, spread about 1 tbsp on one half side of the tortilla with a butter knife. Next place half of the spinach and half of the lettuce followed by 1-2 tbsp of beans on top of the guacamole layer. Sprinkle as much cheese over this. Fold the tortilla over this layered side.
  • Heat the pan on medium and add 1/4 tsp oil. Now place the tortilla in the pan and cook gently until both sides are golden brown.
  • Now this is a Quesadilla. I usually cut it in half or quarters and serve it hot along with salsa and guacamole!
  • Repeat this with the other tortilla.

Bonus recipes :

SALSA GUACAMOLE
Ingredients
Tomatoes – 2 cups chopped
Garlic – 1 clove
Serrano peppers – 1 tbsp chopped
Salt – to taste
Cumin powder – 1/4 tsp

Method
Put all the ingredients in a food
processor or mixer and puree them.
Your salsa is ready!
Ingredients
Avocado – 1 ripe chopped
Lemon juice – 1/2 tsp
Salt – to taste

Method
Puree the avocado in the food
processor. Add a little water if
you want to.
Adjust the amount of lemon and
salt.
Guacamole is ready!

Notes:

  • I add cumin to salsa to cut down on any bitterness that may exist in the tomatoes.
  • Avocados can also be chopped instead of being pureed.

ENJOY!

Potato Patties

I wrote this post sometime in early February and was meaning to post it but I guess I forgot all about it. Hope you will enjoy recreating this recipe!

Here is a easy-to-prepare snack that can also serve as a meal – lunch or dinner. I usually get a little over a dozen patties out of this recipe but it really depends upon the size of each patty. I store them in an airtight container in the refrigerator and use them within 3 days.

Ingredients
Russet Potatoes – 4-5 Large
Green peas 1/2 cup
Carrots 1/2 cup finely chopped
Green onions 1/4 cup finely chopped
Ginger 1 tbsp chopped
Serrano peppers or Jalapeno peppers 1/2 tbsp finely chopped
Cilantro 1/2 cup finely chopped
Salt as per taste
Bread slices 2
Cooking oil Canola or Olive

Method
1. Boil the potatoes.
2. Cook the peas and carrots in microwave for 3 min until soft.
3. Cool and peel the potatoes. Mash them but not completely. Leave some small pieces intact.
4. Add the bread slices in small pieces and gently knead them into the potato mixture.
5. Now add all the remaining ingredients and mix it well.
6. Make about 2 inch balls out of the potato mixture and flatten each ball / patty slightly.
7. Heat the cast iron skillet on med-low and pour 1-2 tsp of oil on it. Place each patty on the skillet
and cook them until golden brown at the bottom. Turn and cook them on the other side, adding
more oil if needed.

Serve 2 ways
1. Split a hamburger bun and heat it over a cast iron skillet using a teeny bit of oil. You may skip the
oil if you want. Place a patty in the bun and top it with shredded lettuce or any other greens, thinly
sliced onions and some sweet and sour sauce or a fresh mint chutney.


2. Reheat a patty and flatten and break it down. Next fill a hot dog bun with the patty, greens, onions
and any condiments you may like.

Enjoy!!!

A Berry Luscious dessert

This is an extremely simple, easy breezy and did I mention “healthy” dessert you can whip up in a jiffy! No measuring required, just eyeball😀

Depending upon the kind of milk and the quantity of sugar, you can keep this dessert low in calories, cholesterol and sugar!

121fc098-8a68-4022-a31d-ac1b18035552            b17e91c1-43f3-4602-b8dd-cb341236fb20

Ingredients

Frozen strawberries, blueberries and bananas.

Milk – just enough to help the fruits blend

Sugar or honey for a little sweetness

Vanilla – just a teeny bit

Method

Blend everything together for about 30 seconds or until the ingredients come together.

Serve right away with fresh blueberries and freeze the rest.

Note – You may also use frozen mangoes or peaches. As for milk, pick any kind you like – regular, 2%, fat free or any nut milk – anything you like!

I am not a fan of sweeteners so I go with low or no sugar.

Enjoyyyyy!

Crispy Spicy Tofu

Here’s a super simple appetizer!


Ingredients
16 oz extra firm tofu cut into cubes
2 tablespoons cornstarch
1/8 teaspoon black pepper
1/8 teaspoon paprika
1/4 teaspoon sesame seeds
salt to taste
2 tablespoons cooking oil
Method
Drain as much liquid as possible from the tofu. One way of doing this is by keeping the slab of tofu between two plates for about half hour and intermittently draining the liquid. Next pat the tofu dry and cut it into cubes that are at least 1.5 inches long.
Mix the cornstarch, salt, pepper, paprika and sesame seeds. Dip each cube of tofu into the cornstarch mixture coating it evenly on all sides and set it aside.
Heat a pan with the oil. Put the cubes one by one into the oil and let them get golden and crisp on their sides before turning them gently on the other sides.
Serve them warm.
Enjoy!!

Kale Pesto


Amp up the pasta with this nutritious pesto from Kale – a low calorie, high fiber, vitamin dense (A, C, K) greens also rich in iron and calcium!!


Ingredients
5 cups coarsely chopped kale leaves
1/2 cup walnuts
4 cloves of garlic
2 tablespoons olive oil
salt to taste
1/8 teaspoon red pepper flakes
Method
Soak walnuts in water for about an hour. I’ve mentioned the benefits of soaking seeds, nuts or beans in The how and why of Sprouting . Chop garlic finely. Heat oil and add the garlic and kale leaves. Cook for 3-4 min on medium high heat. Lower the heat and add the walnuts. Add salt and pepper flakes and then cover and cook for about 5 min. If kale sticks to the pan, sprinkle some water. Let this cool and then blend it in a food processor.
This stays fresh for 3-4 days in the refrigerator or a week in the freezer.
You can enjoy this pesto in pasta or maybe even on toast or salads.

Hello Summer! Wild Rice and Lentil Salad

An earthy, crunchy, sweet salad for summer!

preview (7)

Ingredients

1/2 cup wild rice

1/2 cup brown lentils

1 red bell pepper chopped

1 medium sized carrot chopped

1 tomato de seeded and chopped

3/4 cup chopped cucumbers

2 tablespoons chopped cilantro

1 teaspoon finely chopped serrano pepper (optional)

2 tablespoons dried cranberries

1 tablespoon roasted pumpkin seeds

Lemon juice

1 tablespoon olive oil

1 teaspoon sugar (optional)

Salt and Pepper to taste

Method

Soak the wild rice and lentils in hot water separately for 30 minutes. Drain them. Add 1 1/2 cups of water to wild rice and 1 cup water to the lentils in separate saucepans. Bring them to a boil. Lower the heat and let the rice cook until most of the water has evaporated. Then cover it and cook in lowest heat until rice has cooked. Note – wild rice takes longer than regular rice to cook.

Lower the heat in lentils and cook until soft but not mushy.

While the rice and lentils are cooking, mix the rest of the ingredients together except the salt, lemon juice and olive oil.

Drain the lentils and let it cool to room temperature along with the rice. Add these to the vegetable mixture. Now add the salt, lemon juice and olive oil. Combine everything gently.

Serve as it is and Enjoy😋

NOTE: Cooking wild rice takes some practice so don’t feel discouraged if your rice turns out a little mushy (as mine did). Spread this rice in a thin layer on a plate and let it cool for about 30 minutes. By this time rice loses its mushiness (if any) and holds its texture and shape when stirred together with the rest of the ingredients.

If there’s another way to cook wild rice please share!

Surya Namaskar : a yoga practice

What is Surya Namaskar?
Does it help lose weight?
Is it “cardio” enough?

SURYA NAMASKAR is a yoga practice that comprises of a set / round of 12 poses that are performed rhythmically in a certain order.
Yes! it does help lose extra pounds. One round burns about 13.9 calories.
And it does raise your heart rate also.
BUT if you’ve never tried yoga before, try a couple of classes (maybe at your local gym) to see if it’s your thing AND do consult your physician before trying any new exercises if you have health issues.

SURYA = Sun & NAMASKAR = Salutation

preview (11)
It’s best to start small and build it gradually. You can start with 1 round, take a little rest and complete the second round. As soon as you begin to feel tired, stop and rest.
Round 1
Asana 1 – Pranamasana / Prayer Pose
Stand straight with your feet together and hands joined against your chest in a prayer position. Breathe in and breathe out.
Asana 2 – Hastauttanasana / Raised hands pose
As you breathe in, raise your arms towards the sky. You may bend slightly backward as you do this.
Asana 3 – Hasta Padasana / Hand to Foot Pose
Breathing out, bring your arms down to your feet. For those who find this difficult, you can reach as far as possible and can even bend your knees.
Asana 4 – Ashwa Sanchalanasana / Equestrian pose
As you breathe in, stretch your left leg as far back as possible and bring up your right knee with palms touching the floor.
Asana 5 – Dandasana / Stick Pose
Breathing out, push your right leg back and bring your body in a straight line with arms perpendicular to the floor, as if you are doing a push-up.
Asana 6 – Ashtanga Namaskar / 8 point salutation
Breathe in and lie straight with the 8 points – your feet, hands, knees, chest, and chin touching the floor and the hips raised slightly. Breathe out.
Asana 7 – Bhujangasana / Cobra Pose
As you breathe in, raise your chest upwards with elbows bent and hands touching the floor.
Asana 8 – Parvatasana / Mountain or Downward facing dog pose
Breathing out, raise your hips up and head and chest down in an inverted V position.
Asana 9 – Ashwa Sanchalanasana (asana 4)
As you breathe in, stretch your left leg as far back as possible and bring up your right knee with palms touching the floor.
Asana 10 – Hastapadasana (asana 3)
Breathing out, bring your arms down to your feet. For those who find this difficult, you can reach as far as possible and can even bend your knees.
Asana 11 – Hastauttasana (asana 2)
As you breathe in, raise your arms towards the sky. You may bend slightly backward as you do this.
Asana 12 – Pranamasana (asana 1)
Breathe out and stand straight with your feet together and hands joined against your chest in a prayer position. Breathe in and breathe out.

Round 2
It’s the same as round 1 except that asanas 4 & 9 are performed with left knee bent and right leg pushed backward.
Take it easy, breathe and relax.

The how and why of Sprouting

This slideshow requires JavaScript.

A super healthy way to consume beans!

Since spring’s just around the corner I thought why not share something healthy with all of you. I know this is a longish post but I hope by the time you finish reading it you’ll understand the science behind sprouting better and also might want to try it out in your own kitchen!

Science behind sprouting

We already know these foods are nutrient dense powerhouses. But for our bodies to be able to absorb all that richness, we need to first understand the phytic acid connection.

PHYTIC ACID is found in all plant foods in variable amounts. It’s not all that bad because it attacks cancer cells and is also an antioxidant BUT when consumed, it binds to important minerals like iron, zinc, calcium, magnesium and copper in the gastrointestinal tract forming PHYTATES which can’t be absorbed and so are expelled from the body resulting in deficiencies of minerals mentioned.

Coming to the rescue is PHYTASE – an enzyme found in the plant food, that deactivates the phytic acid. Rye, wheat and buckwheat are high in this enzyme while oats and corn are pretty low.

We humans cannot produce this enzyme but we can use methods like SOAKING n SPROUTING to activate this enzyme.

Here is a simple and easy breezy way to start. To begin I assemble a few old pickle jars, poly mesh bags cut into squares and some rubber bands and some mung beans. That’s all! 

SOAK

1. Place the beans in the jar/s and wash them a couple of times with water until the drained water looks clean.

2. Pour room temperature water into the jar to completely submerge the beans.

3. Add some sea salt if soaking nuts, seeds and beans. This helps activate the phytase.

4. Cover the mouth of the jar with a square of poly mesh bag and keep it in place with a rubber band.

At the end of soaking period, you’ll notice that the size of the grains or beans has increased.

SPROUT

1. After the soaking period, wash and drain the water from the jar through the mesh a couple of times until water is clear.

2. Make sure that all the water has been drained out. Now slightly invert the jar at an angle over a folded towel or rack and cover that bowl with a cloth in a dark area of the kitchen away from direct sunlight.

3. Twice a day – morning and night or every 12 hours, rinse and drain the beans for the designated sprouting period.

This process removes some more phytic acid as well as releases the vitamins and makes the food a lot more digestible. As soon as the sprouts are ready, wash them one more time. I prepare only small amounts of sprouts at a time and cook them right after they are ready by gently boiling them in water OR by steaming them. I make sure that they are consumed in 1-2 days.

NOTE – It is very important to handle the sprouting process very meticulously using CLEAN hands, kitchen equipment and counter tops to reduce contamination and food borne illnesses such as Salmonella and E coli.

What’s the best way to eat sprouts?

Sprouts always carry a risk for contamination as they grow under moist conditions. So it is safer to COOK them before eating. They can be added to soups or stews or they can be sauteed in olive oil. You can 

Actually I choose to sprout only mung beans (I’ve got so used to them). But you can try black chickpeas also. The process is similar to that of mung beans. So give this a try this spring and share your experiences with me. Happy Sprouting!


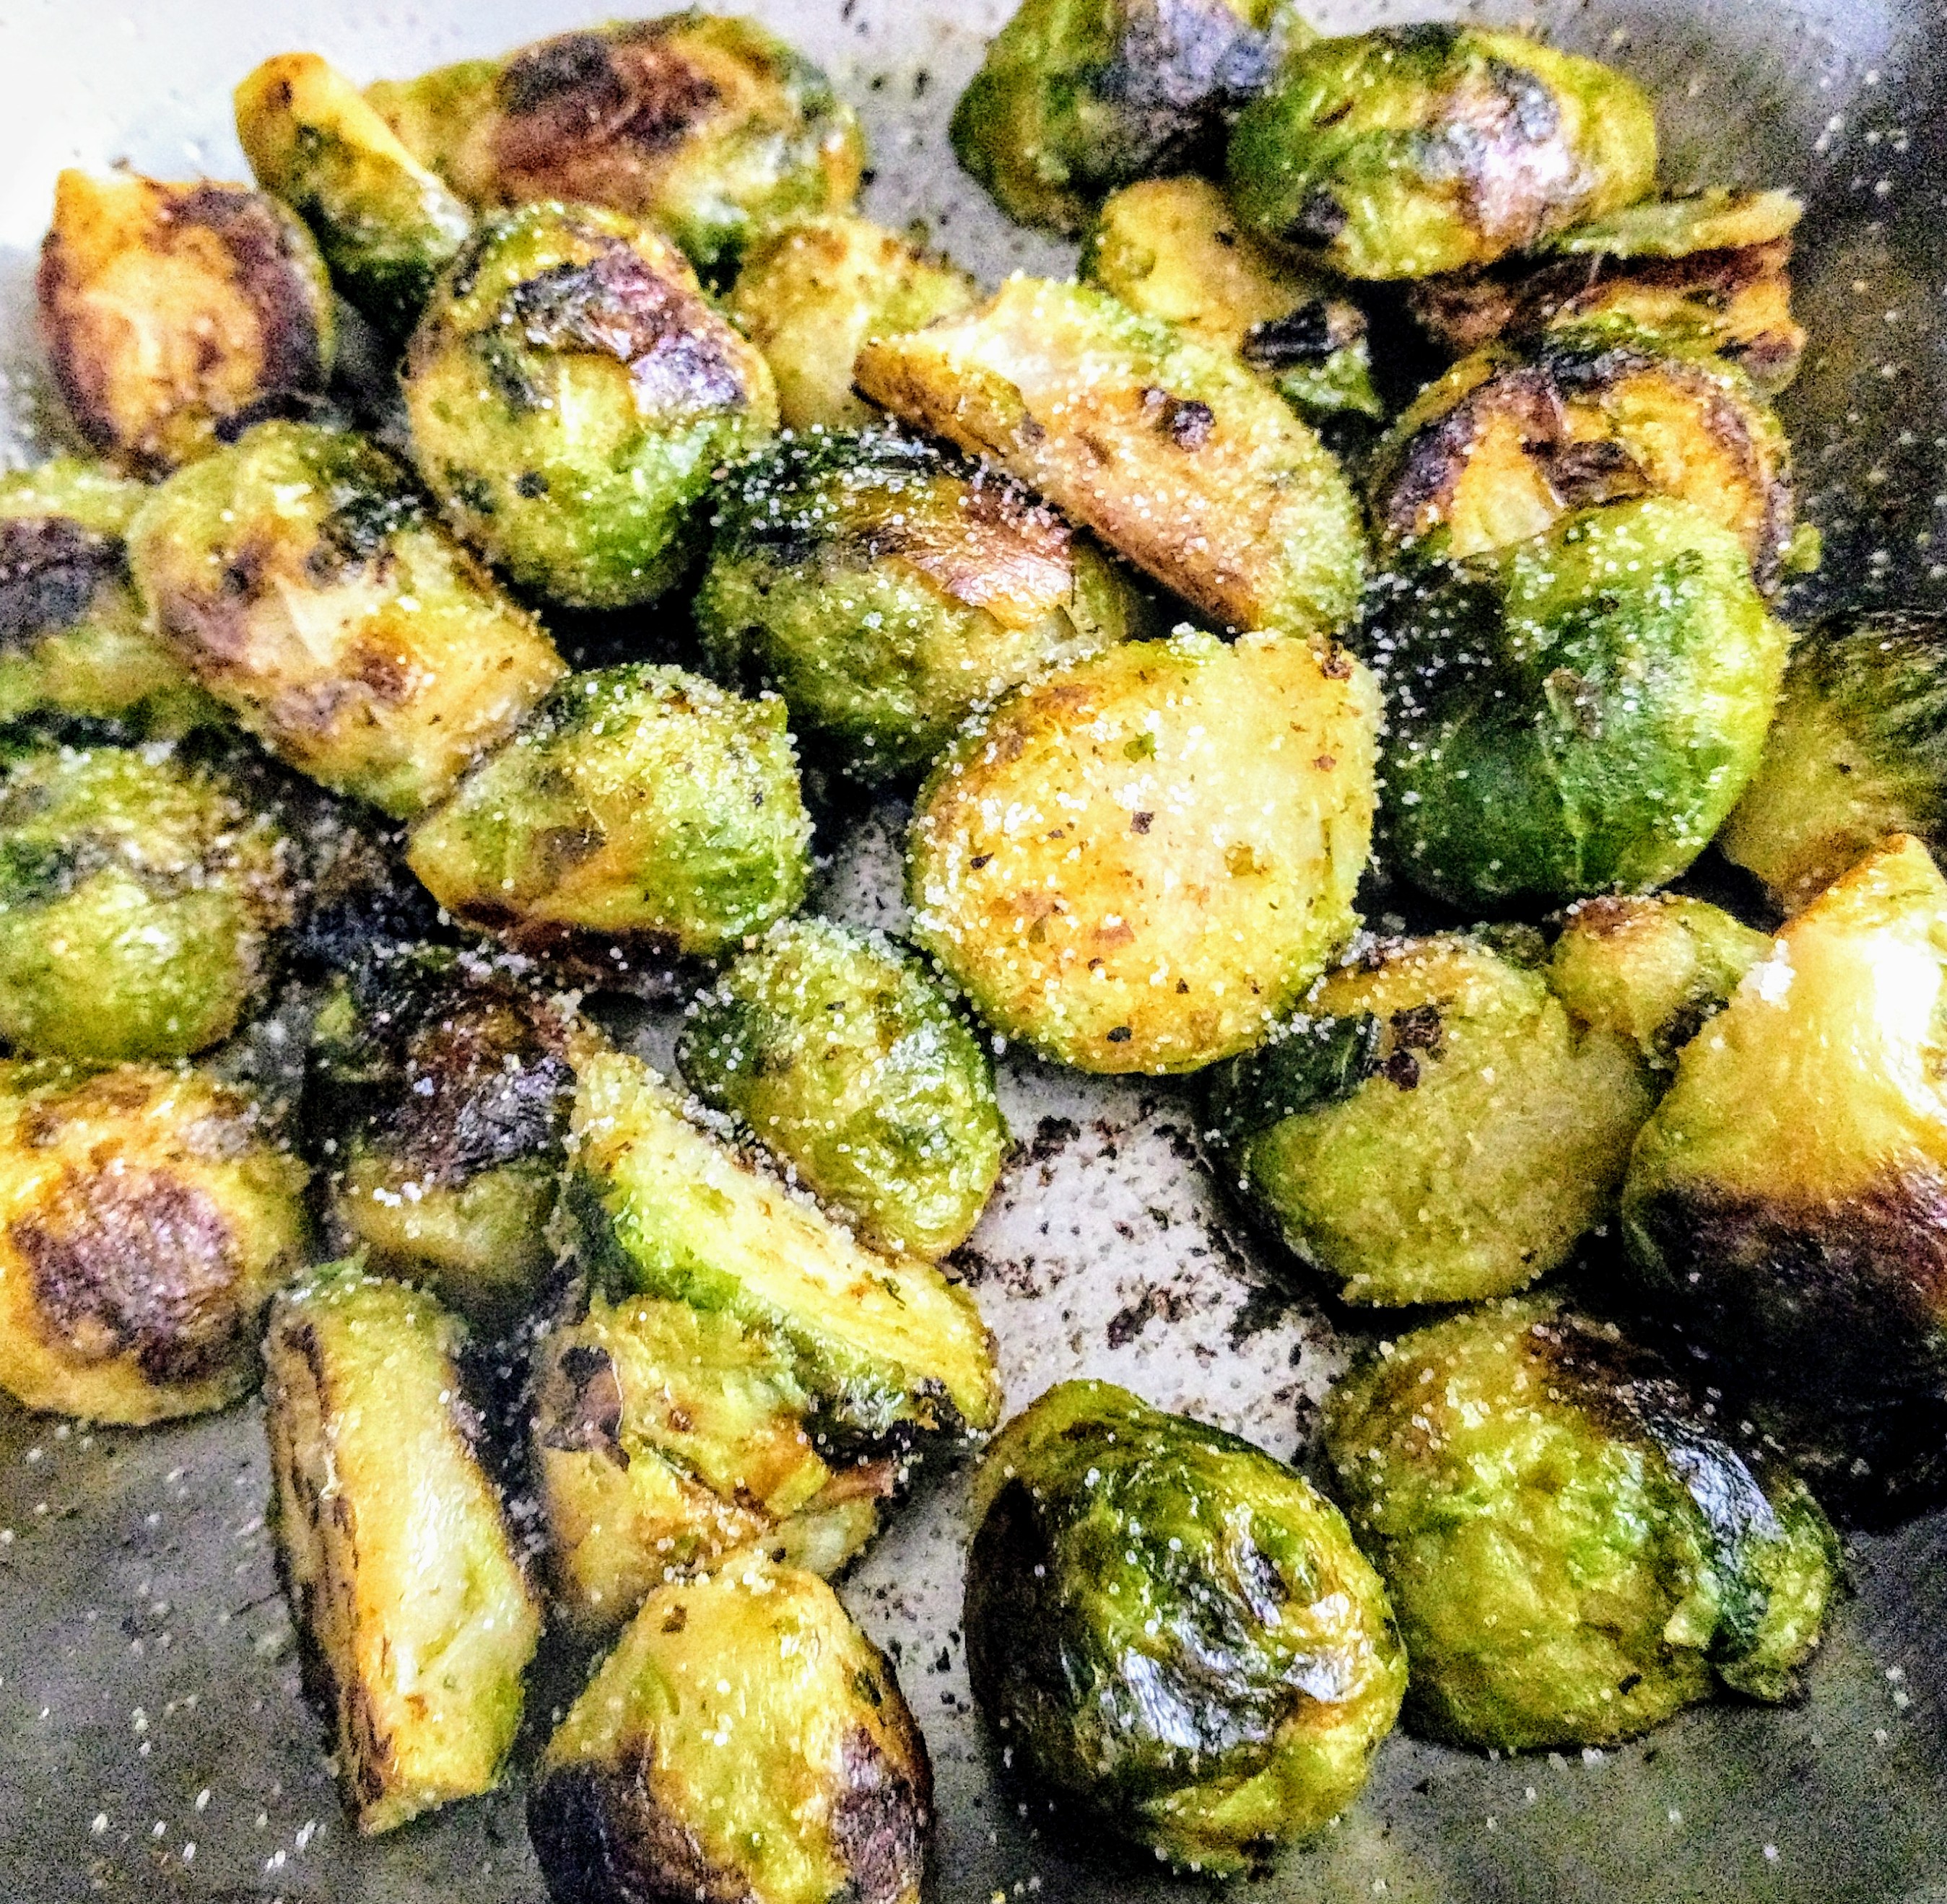
A tiny cabbage called Brussels Sprouts!

Many of you will agree with me on this – Brussel Sprout is NOT appealing – in taste or smell!! But did you know that it is one of the healthiest veggies around? Here are a few of the reasons it is a Hero!

1. It is very high in sulfur-containing substances called Glucosinolates (also found in kale, cauliflower, and broccoli ) that impart the pungent smell and taste. Along with a high concentration of vitamin K – these protect the body from a state of inflammation. And as you should know that long-standing inflammation in the body serves as the basis for diseases like cancer.

2. It is rich in Antioxidants like Vitamin C and Manganese which fight the bad guys – free radicals and protect the body from cancer.

3. It is also rich in Fiber which not only supports digestive health but also lowers cholesterol.

4. Believe it or not, it also provides Omega 3 fatty acids. So good for the brain and heart!

Here’s a very simple and healthy recipe that I would like to share with you. 

IMG_20170911_115025068_2

Stir Fried Brussel Sprouts

Ingredients

1 12-16 oz frozen package Brussel Sprouts 

1 tablespoon olive oil

1/2 teaspoon cumin seeds

1/4 teaspoon red pepper flakes (if you like it hot)

Salt n Pepper to taste

Method

Microwave the Brussel Sprouts as directed. Empty and drain the sprouts. Heat a tablespoon of olive oil in a pan. Just as the oil begins to heat, add the cumin seeds and as they start crackling, add the sprouts to the pan. Turn up the heat to medium-high. Remember, they are already cooked in the microwave! So all they need is a good coat of olive oil and that charred roasted look. Shake the pan a couple of times. Turn off the heat and serve them hot and sizzling with a dash of salt and a sprinkle of black pepper.

Snack away!!


A chill busting, grounding soup to warm your souls!!


preview (9)  

Ingredients

1 tablespoon olive oil

1 (12 oz) frozen corn

1 medium size Russet potato

1 cup chopped zucchini

1 medium size onion chopped

4 cloves of garlic

1 Serrano pepper chopped

1 cup vegetable broth or water

½ cup coconut milk

Salt and Pepper to taste

1 tablespoon chopped cilantro


Method

Heat the oil. Add the garlic, onions and potatoes. Saute them until they turn light brown. Now add the corn, zucchini and serrano pepper. Saute for 4-5 minutes on medium high. Add the broth, salt and pepper and bring the mixture to a boil. Lower the heat and cook covered on medium low until potatoes are cooked. Stir in the coconut milk and cook for about 5 minutes. Turn off the heat and let the soup cool (maybe an hour or so).

Once the soup has come to room temperature, puree it in a blender until smooth. You can also sieve the soup to get a smoother texture. Serve the soup warm garnished  with cilantro.


Keep those greens!

Beety Radishy Greens

IMG_20180224_135219518

Here is an extremely simple and nutritious recipe to make the most out of the beets and radishes! While these veggies are very nutritious, their green are no less! Chop the tops of these vegetables and wash the greens several times in cold water. Drain them and use them right away or within 2 days while they are still fresh and crisp.

Beet greens are excellent sources of vitamins K & A and both calcium and magnesium. They also are a decent source of iron.

Radish greens are very rich in vitamin C and B6. They are also rich in anticancer compounds called sulforaphanes.

Moreover these greens are low calorie, cholesterol free and fiber rich foods which also helps in weight loss. 

Ingredients

Bunch of radish greens (about 2 cups)

Bunch of beet greens (about 2 cups)

3 cloves of garlic

1 tbsp of olive oil

1-2 tbsp water

1/8 tsp red chilli flakes 

Salt to taste

Method

Heat the pan on medium heat with the olive oil. Saute the garlic until slightly browned. Add the greens and saute for a minute. Add the water, salt and chili flakes. Cover the pan and let it cook for 5-6 minutes on low heat. Your greens are ready!

Serve hot. Tastes great as such or as a side dish. 

Breakfast time – Old fashioned Porridge


Enjoy this warm & earthy breakfast meal.:

Ingredients & Method

1 cup rolled oats

2 cups water

1/8 cup chopped almonds

1 tablespoon brown sugar

1-2 tablespoons milk (optional)

1 tablespoon raisins

1/8 teaspoon cinnamon powder

pinch of crushed cardamom

drizzle of honey

Bring water and almonds to a gentle boil. Add rolled oats, brown sugar, milk and cook on medium heat for 3-4 minutes. Remove from heat. Sprinkle raisins, cinnamon and cardamom and serve with a drizzle of honey.

I serve this for breakfast a couple of times a week. You can always tweak the recipe by adding other toppings such as fresh berries, walnuts or anything you fancy.

Rolled oats porridge may sound old fashioned but it is a wholesome and healthy meal. It’s loaded with B vitamins, iron and manganese. It also provides soluble fiber which helps reduce cholesterol. And best of all, it is sodium and cholesterol free.

Fragrant Apple Ambrosia


Ingredients

2-3 medium sized apples, chopped

1/3 cup water

3 black peppercorns

2 cloves crushed

1/2 tbsp chopped ginger

1/4 tsp ground cinnamon

1/8 tsp ground nutmeg

1 tbsp brown sugar

1 tbsp golden raisins

Method

Add chopped apples, peppercorns, cloves, ginger and water to a saucepan and cook on medium high heat for 5 min. Add cinnamon, nutmeg and brown sugar and cook on low for 25 min or until apple mixture begins to soften.

Serves 3-4. Sprinkle a little more cinnamon if you like before serving.

Enjoy this savory, wholesome recipe – a warm accompaniment to those cool mornings in fall and winter. In ayurveda, cooked apples are tridoshic, meaning they balance all the 3 doshas – vata, pitta and kapha.